Some Photoshop Font Preview Tips
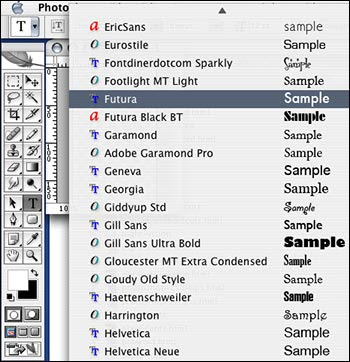
Now that Photoshop has a nice font preview feature, you can get a glimpse of what your type faces look like right in your Character Palette menu. An extra nice touch is that the size of the font previews can be changed.
Now that Photoshop has a nice font preview feature, you can get a glimpse of what your type faces look like right in your Character Palette menu. An extra nice touch is that the size of the font previews can be changed.
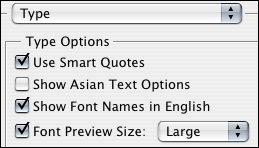
 To do this choose Photoshop> Preferences> Type on the MAC. In Windows you'll find Preferences in the Edit Menu.
Ok, here are the power user shortcuts: Control-K (MAC: Command-K) brings you to Photoshop Prefs. Once there Control-9 (MAC: Command-9) will jump you to Type Prefs.
From there you'll find a new Type Preferences Dialog Box, and in it you'll see the option for three preview sizes: Small, Medium and Large. A tip here is that Small and Medium only change the size of the preview, but Large changes the size of the preview and the size of the font name as well.
Once you've made your selection click OK and samples of all of your fonts will now display on the right side of the Character palette menu in whatever size you selected. Try it out.
How To Turn Off Font Preview
How To Turn Off Font Preview
In the Preferences dialog box choose Type and uncheck Font Preview Size, and the font preview will be turned off.
 More Good Stuff
You'll also notice that beside each font there will be one of 3 symbols. A "TT" indicates a TrueType font, an "a" indicates a Postscript Type 1 font, and an "O" indicates an OpenType font.
Now here's another tip — when you scroll through the font list, if you have a lot of fonts (and who doesn't!) and you feel like it's taking forever to scroll through them, you can just hit one of the letters on your keyboard to jump to that section of your fonts. I also use this technique to quickly jump to the middle of my font list or to go right to the end, by simply hitting "M" or "Z" on the keyboard.
If you have a lot of fonts that start with the same letter, just type more letters from the name of the font for it to become selected. For example "my" will jump you instantly to Myriad.
For more precise control when browsing your fonts, you can also scroll through the list font-by-font by using your Up and Down keyboard arrow keys.
Use The Options Bar For Font Previewing
As an experiment, the next time you have the type tool selected, instead of choosing to view your font list through the Character Palette try using the Options Bar (the top bar that floats just below the menu) to view your fonts. No Options Bar showing? Make sure you have it selected to show by going to Menu> Window> Options.
On a big screen the Options Bar Menu gives me a much longer initial list and seems to be a little more speedy than the Character Palette Menu.
 Making The Bounding Box For A Type Layer Visible
If you want to see the bounding box for a block of your text, simply select the Move Tool (V), click the type layer in the Layers Palette, and check Show Transform Controls in the Options Bar. Remember, this will only work if you have the Move Tool selected.
Now here's another tip — when you scroll through the font list, if you have a lot of fonts (and who doesn't!) and you feel like it's taking forever to scroll through them, you can just hit one of the letters on your keyboard to jump to that section of your fonts. I also use this technique to quickly jump to the middle of my font list or to go right to the end, by simply hitting "M" or "Z" on the keyboard.
If you have a lot of fonts that start with the same letter, just type more letters from the name of the font for it to become selected. For example "my" will jump you instantly to Myriad.
For more precise control when browsing your fonts, you can also scroll through the list font-by-font by using your Up and Down keyboard arrow keys.
Use The Options Bar For Font Previewing
As an experiment, the next time you have the type tool selected, instead of choosing to view your font list through the Character Palette try using the Options Bar (the top bar that floats just below the menu) to view your fonts. No Options Bar showing? Make sure you have it selected to show by going to Menu> Window> Options.
On a big screen the Options Bar Menu gives me a much longer initial list and seems to be a little more speedy than the Character Palette Menu.
 Making The Bounding Box For A Type Layer Visible
If you want to see the bounding box for a block of your text, simply select the Move Tool (V), click the type layer in the Layers Palette, and check Show Transform Controls in the Options Bar. Remember, this will only work if you have the Move Tool selected.
 The other thing about this is that you can now start to scale interactively. Click a corner handle and drag to scale the height or the width. To keep the proportions of your scaling you have to Shift-drag a corner handle.
Change Type Orientation From The Palette
In the Layers palette just Right-click (MAC: Control-click) a type layer name and then choose the Horizontal or Vertical option from the menu that appears. If nothing changes, you're already in that orientation. I mention this because I sometimes get my vertical and my horizontal mixed up and accuse Photoshop of being stubborn before realizing my mistake.
Rasterize From The Palette Menu
You can now Right-click (MAC: Control-click) an editable type layer and then choose Rasterize Type from the menu that appears. Time-saver!
 New Fast Warp Text Options
Select one of your editable type layers and Right-click (MAC: Control-click) - then choose Warp Text. The Warp Text dialog box will appear. Pick one of the styles from the Style dropdown menu and then start doing wonderful things to your type.
Make sure the Warp Text dialog box is not covering your text, because you have a live preview here - which you'll need to reference so you can tweak the settings to make it all just so beautifully perfect.
New Smart Guides For Smart Moves
If you are working with multiple layers and want to align things, before you start to move a type layer, try turning on View> Show> Smart Guides. Smart Guides appear automatically to help you align shapes and selections.
Special lines appear when the active layer aligns with another layer in the image, and then they disappear when you're done. I love this!
 Automatically Aligning Multiple Type Layers
Sometimes you'll have some type on different layers, scattered on your canvas, and find that you want to align the layers. It's now a very simple operation.
First select the layers that you want to align. Next go to the menu and choose Layer> Align and then pick from one of the sub-menu options. That's it!
Add New Text Close To Existing Text
When you add new text too close to some existing text the Type tool will sometimes react as though you want to edit the existing text, which can be extremely frustrating. To get around this hold down the Shift key while you click with the Type tool. This creates a new type layer, and will help you avoid any more mistaken assumptions from your type tool.
Shortcuts For Aligning Type
After you highlight your type you can use the following keyboard shortcuts to apply flush left, centered, and flush right:
Align Left: Shift-Control-L (MAC: Shift-Command-L)
Align Center: Shift-Control-C (MAC: Shift-Command-C)
Align Right: Shift-Control-R (MAC: Shift-Command-R)
Photoshop Type "A" Personality
Yes, I've been tested by experts and I have a Photoshop type "A" personality, which means I have an unnatural desire to learn everything about Photoshop, which also means I'll be updating this page as I discover new tips and tricks. So please come back every once in a while!
 About the Author : Andra Permana Halim. I love Design Grafis and all about Design and Art. Work in Neomatix Corporation as Pro Model. And This is My Design Blog. Thanks for visit to Andrastorm Design Studio. I like You..!!!

0 comments:
Leave your Comment